
Easy Gluten-Free Granola Recipe
This Gluten-Free Granola recipe is your new pantry-cleanout bestie. It’s simple to make, dirties minimal dishes, and is sure to please even the pickiest breakfast guests. Make a double batch to have some on hand for hostess gifts. (It freezes like a dream!)
I’ve been baking large sheets of homemade granola since my days as a baker for the Flying Apron (a LONG time ago). Pulling crunchy, caramelized oats and nuts coated in maple syrup, spices, and good-fat oil woke something up in my senses that I’ve never been able to shut off. If you’ve never made your own granola, I want this feeling for you. So much.
Easy Gluten-Free Granola Recipe
Equipment
- 2 Large Baking Sheets
- Parchment paper
- Measuring cups and spoons
- Rubber spatula
- Jars or freezer bags for storing
Ingredients
- 2 1/2 cups Gluten-free oats
- 1 cup Raw, unsalted pecans
- 3/4 cup Unsweetened coconut flakes
- 1/2 cup Raw, sliced or slivered almonds
- 1/2 cup Pepitas or shelled pumpkin seeds
- 1/3 cup Real maple syrup
- 1/3 cup Avocado oil
- 1/8 cup Brown sugar
- 1 Tablespoon Vanilla extract
- 1/2 teaspoon Kosher salt plus more to taste
Instructions
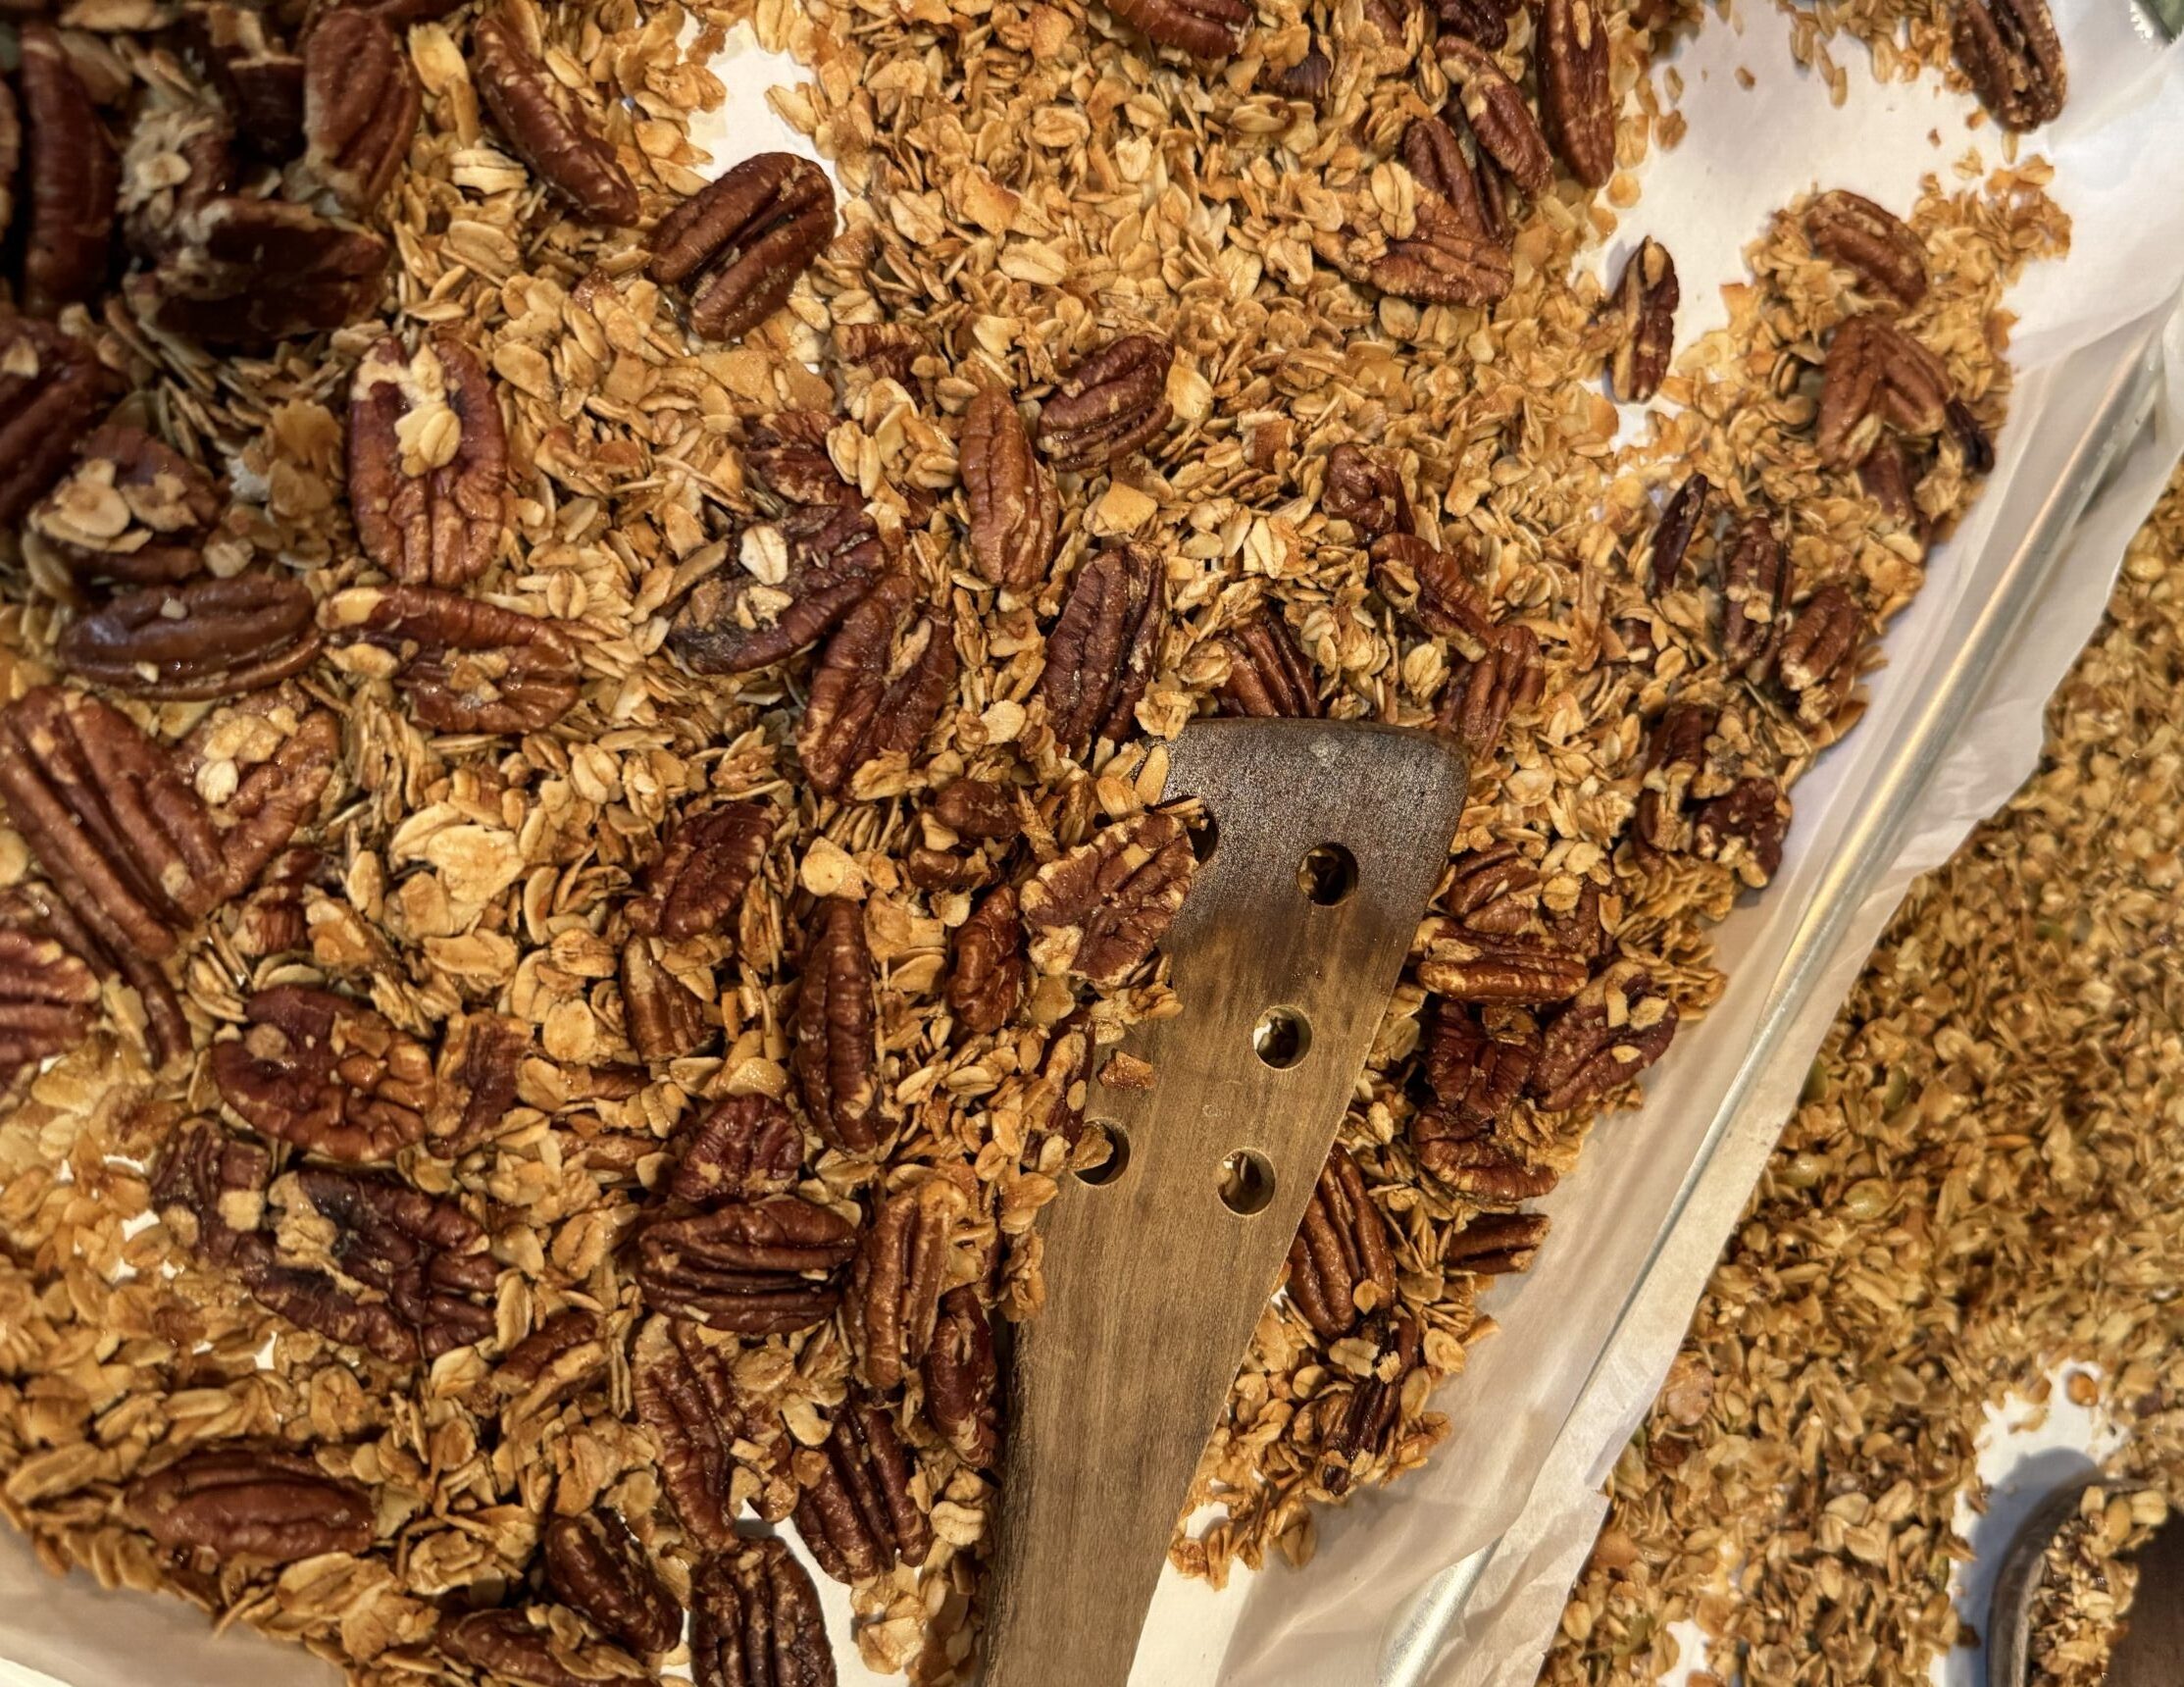
- Add all ingredients to a large mixing bowl. Stir until well combined. Keep the pecans whole to avoid burning during the bake.
- Place oven racks in the upper half of the oven and pre-heat to 300℉. Line two large baking sheets with parchment paper.
- Using a spatula, evenly distribute the granola mixture onto each parchment-lined baking sheet in an even layer.
- Bake for 15 minutes, then remove the baking sheets from the oven, stir the granola mixture, smooth into an even layer once again, and return to the oven. Repeat this step 2 additional times, for a total of 45 minutes of baking or until the oats are golden brown.
- Allow the granola to cool for 15 minutes prior to sampling. The crunchy texture will reveal itself once the granola has completely cooled.
- Once cooled, use clean hands to break the pecans into smaller pieces, or leave them whole if you like. Store in clean jars or resealable plastic bags for up to four weeks in the pantry or three months in the freezer. Enjoy!
Notes
- Try adding different extracts in addition to or in place of the vanilla. My all-time favorite is almond extract with a heaping teaspoon of cardamom! Also, lemon extract alongside some poppy seeds for another classic flavor combo.
- Buying nuts, seeds, spices, and grains in bulk allows you to only buy what you need and keep costs lower. I find this helpful when trying out new recipes and flavor combinations.
- If you’d like to make a lighter version, increase the amount of oats and decrease the nuts, reduce the oil to 1/4 cup.
- Baking the Gluten-Free Granola mixture just a bit longer than you think you should results in an almost caramelized result worthy of an ice cream topper or dessert. Be careful not to burn the nuts!
- More on burning the nuts: Cashews, in particular, burn rather easily. I recommend adding them whole and for the last 7 minutes of the bake. Pecans, too, are a bit fragile but if added whole can usually withstand the entire bake, just watch the edges.
- If you do fear you’ve over-baked the granola, carefully move the mixture from the oven-hot pan to a room-temperature baking sheet and spread out to cool. This keeps the granola from continuing to cook beyond its time in the oven.
- I intentionally omit dried fruit from my granola recipes because I often enjoy it with fresh fruit and find both to be redundant. If you’d like to add dried fruit to your batch, start with 1/2 cup and be sure to mix it in after the granola has baked and cooled.
Nutrition
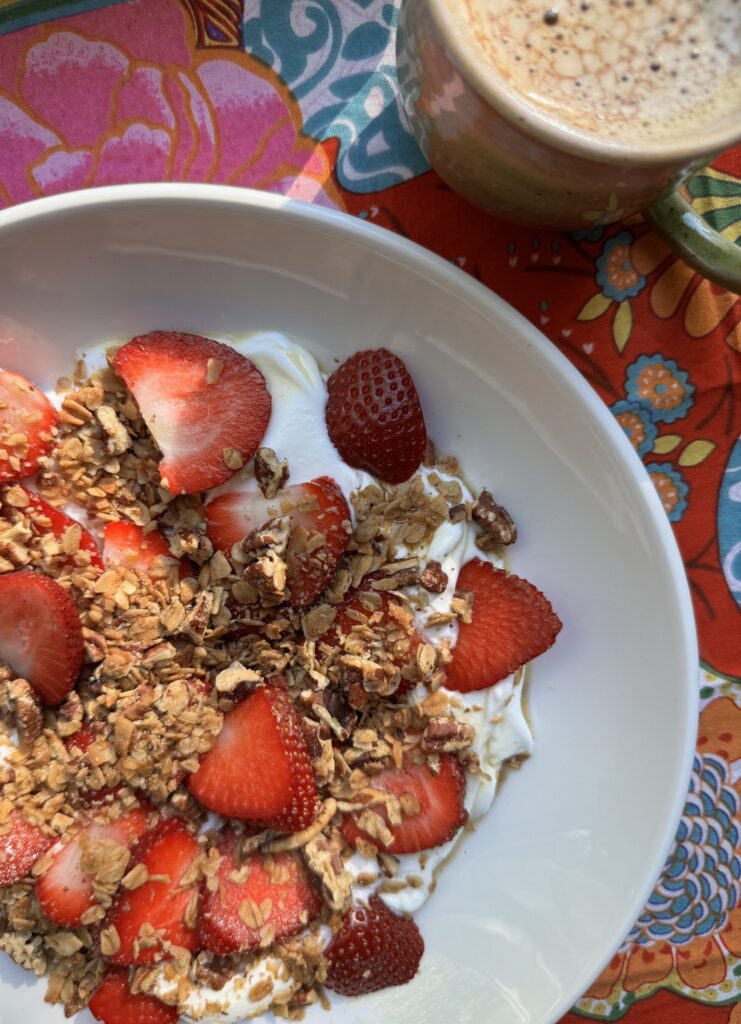
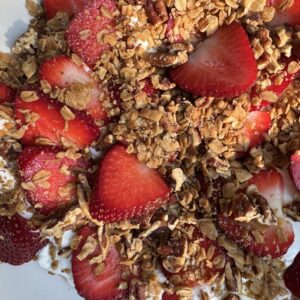
Eat it warm, by the handful, on the way to a rainy soccer practice. Pile it on top of your favorite Greek yogurt. Bag it up for school lunches and road trips. Sprinkle it on custardy, vanilla ice cream. Do what you like with it, just please, please, please share it with people you love.

What makes this “Gluten-Free” Granola?
One of the kindest things we can do as a host is to know the dietary needs of our guests, especially when it comes to their health and safety. This recipe swaps your traditional old fashioned oats with Certified Gluten-Free Oats to make this wholesome, flavor-packed granola gluten-free. Be sure to avoid adding any other ingredients or cross-contaminating with items in your kitchen that may contain or may have been in contact with wheat, especially if you’re gifting or serving this recipe to friends with Celiac Disease or other serious gluten-related dietary limitations. Carefully read the packaging of any ingredients you add to your GF oats to be safe!
Why make your own granola?
Store-bought granola has it’s place and some brands and flavors are notably delicious, don’t get me wrong. However, granola is also a product that often lends to additives and “filler” ingredients (hello, puffed rice!?) that simply aren’t necessary.
When I reach for a jar of my homemade, Gluten-Free Granola, I know exactly what’s in it, how long it’s been stored, and can feel good about indulging in something wholesome and delicious. Also, it’s one of the best ways I’ve found to leverage pantry ingredients that need to be used. The last handful of cashews or a scant tablespoon of sesame seeds? Toss them in the bowl! Coming up with a variety of textures and flavors is part of the fun! (See my recipe notes for some flavor combo favorites!)
Lastly, granola (and anything labeled “Gluten-Free”) can be outrageously priced for what it is. Sure, the up-front cost of a bag of pecans and some sprouted GF oats may feel costly, but the amount of things you can create from them is infinite.
Did I mention your house is about to smell like a combination of your favorite bakery and your sweet grandmother’s kitchen on Sunday mornings as a child? Need I say more?

Ingredients for Gluten-Free Granola
- Gluten-free oats
- Unsweetened coconut flakes
- Raw, unsalted nuts (use what’s in your pantry first!)
- Pumpkin seeds
- Real maple syrup
- Avocado oil or neutral-tasting olive oil
- Brown sugar
- Kosher salt
- Vanilla extract
My recipe notes
- Try adding different extracts in addition to or in place of the vanilla. My all-time favorite is almond extract with a healthy spoonful of cardamom! Also, lemon extract alongside some poppy seeds for another classic flavor combo.
- Buying nuts, seeds, spices, and grains in bulk allows you to only buy what you need and keep costs lower. I find this helpful when trying out new recipes and flavor combinations.
- Baking the Gluten-Free Granola mixture just a bit longer than you think you should results in an almost caramelized result worthy of an ice cream topper or dessert. Be careful not to burn the nuts!
- More on burning the nuts: Cashews, in particular, burn rather easily. I recommend adding them whole and for the last 7 minutes of the bake. Pecans, too, are a bit fragile but if added whole can usually withstand the entire bake, just watch the edges.
- If you do fear you’ve over-baked the granola, carefully move the mixture from the oven-hot pan to a room-temperature baking sheet and spread out to cool. This keeps the granola from continuing to cook beyond its time in the oven.
- I intentionally omit dried fruit from my granola recipes because I often enjoy it with fresh fruit and find both to be redundant. If you’d like to add dried fruit to your batch, start with 1/2 cup and be sure to mix it in after the granola has baked and cooled.
If you enjoyed this recipe, be sure to Pin it for future use! And if you’re a brunch lover like I am, you might enjoy this Cherry Almond Scones recipe. Beautiful almond flavor, not a nut in sight! Cheers, friend!
Just tried a sample bag of your granola. Most excellent and perfect amount of sweetness! Will try making at home. Thank you!
I’m so glad you enjoyed it! You are most welcome.
First, my house smells AMAZING. I want my house to smell like this always. Second, I didn’t have all the ingredients you mentioned on hand, but I substituted other ingredients I had in my pantry and it still turned out great! I love how versatile this recipe can be. My only “problem” is how quickly my toddlers eat it. There’s hardly any left for me! I make it on repeat!
I’m so glad you love it! It warms my heart that you’re making this for your fam. Thanks for the sweet note!